RV Circuit Breakers Trip- Here is why.

Why Does Your RV Circuit Breaker Trip? See Possible Reasons Below

Y4TZw

The receptacles in the RV are protected by a circuit breaker and/or the GFCI system. Hair dryers, curling irons, toasters, coffee makers, etc. use a very high amount of electricity (amperage). Each circuit is rated at 15 amps. Typically, any combination of two of these types of accessories will draw more than 15 amps which will cause the breaker to trip. It may be necessary to operate only one of these types of accessories at a time.

This section gives you running amps on components that are commonly used in Recreational Vehicles. Amperages may vary, check your individual products for exact amperage.

COMPONENT (AMP DRAW)

  • Microwave (15 amp)
  • Four-Slice Toaster (15 amp)
  • Hair Dryer (12.5 amp)
  • Water Heater on Electric (11.6 amp)
  • Vacuum Cleaner (11 amp)
  • Griddle (10.8 amp)
  • 13.5k Air Conditioner (10 amp)
  • Two-Slice Toaster (7.5 amp)
  • Coffee Maker (7.5 amp)
  • Printer (7.1 amp)
  • Refrigerator (5.5 amp)
  • 19″ LCD TV (2.5 amp)
  • Computer (1.7 amp)
  • Flat Iron (1.4 amp)
  • X-Box 360 (1.4 amp)
  • Laptop (0.75 amp)
  • Curling Iron (0.7 amp)
  • DVD Player = 70 watts (0.6 amp)
  • X-Box (0.6 amp)
  • Satellite Receiver (0.5 amp)
  • Play Station 2 (0.25 amp)
  • LED Alarm Clock (0.2 amp)
Share Button

10 Tips To Sell Your RV Fast and for Top Dollar

Colman’s RV Quick Tips

How to Sell Your RV Fast and for The Most Money?

1) Clean, Clean, Clean. Remember the three things about real estate? Location, Location, Location! Well, when selling your RV its Condition, Condition, Condition!

2) Get the funk out! If your RV smells a little musty or funky, try airing it out and using one of the readily available odor eliminators on the market, like 3M Mold and Mildew Remover, Febreze, or Odor Eliminator and make it smell nice and new. No one wants their new RV to smell like grandma’s basement. 😊

3) Remove your personal belongings. Prospective buyers want to see the RV they are considering buying as their new RV, not someone else’s old one.

4) Lots and lots of pictures. Have to say this one again… lots and lots of pictures. We recommend 25-35 pictures. Make sure and show all the great features of the RV, be careful not to take too many close ups, you want them to get a total feel for it. You want nice “Glamour Shots” but also include any deficiencies or damage. Nothing will stop a deal faster than someone coming to buy it, but you didn’t show them the one small issue it has. Talk about all deficiencies openly and up front to ensure they are never a deal breaker.

5) Repairs. If any repairs or small touch ups are needed, get it done prior to showing. If you don’t have to apologize for anything, there is no reason to lower your price!

6) Service records. If you have them, flaunt them. If your RV has been well maintained – prove it!

7) Titles and registration. Locate your title(s) and registration ahead of time, no one likes scrambling around at the last minute trying to locate paperwork, and plus some banks require a copy of it if your buyer is financing their new RV.

8) Owners’ manuals. Buyers love to have the manuals. It makes the used RV seem more like a brand new one, and it helps them if they have any questions (instead of calling you!) 😊

9) Extended Warranty/Service Agreements. If you purchased a service agreement or appearance protection, like Freedom Protection or Nano Protection, on your RV, make sure you advertise it and have the paperwork ready for any prospective buyers.

10)  Where to list your RV for sale: Spend the money on a good listing on a good, classified website like RV Trader, RVT.com, RV universe, etc. The exposure is worth it, and while free listings like Facebook Marketplace and Craigs List should be utilized also, they do not have the geographic reach and marketing power that the classified websites have.

Call Us Today for more information- (217) 793-7300

We Buy RVs at Colman’s RV | Find Out What Your RV is Worth (colmansrv.com)

Share Button

RV Slide Out Maintenance and Repair

Learn About RV Slide Outs and How To Keep Them Running Great.

What-is-an-RV-slide-out

RV slide outs, also known as slides, are room extenders that can enhance the living space of your rig. They are common in motorhomes, campers, fifth wheels, toy haulers, and virtually all types of RVs for sale today. While RV slides weren’t part of the first RVs on the road decades ago, they are now common and many campers expect to see slide outs on their RV. Get the lowdown on RV slide outs and tips for keeping yours working properly if you have them on your RV.

HOW DOES AN RV SLIDE OUT WORK?

RV slide outs work by changing from an extended to retracted position depending on whether your RV is set up for camping or driving. They are typically operated through an electrical system on your RV’s control center, where the push of a button can retract or expand the slide. There are also hydraulic or manual mechanical RV slide outs.

Depending on the type of slides you have, your slide out will likely work by using a pump, electricity, or elbow grease to push or pull the slide out along its tracks. Slide outs are built to evenly distribute weight and maneuver smoothly. Inside your RV, the slide out generally has furniture or other features that, when expanded, offer added interior space to your RV.

When you’re getting ready to drive or you’re on the road, your RV slide should be in the retracted position so that your rig is as aerodynamic as possible. Under no circumstances should you drive your RV with your slide out extended, doing so can be dangerous for you and others on the road. You should only extend your RV slide out when you’re ready to camp, which is when you can open the slide to extend your RV’s interior space. Depending on the location of your slide, extending the slide add space to the kitchen, living room, bedroom, or even to the bathroom.

KEEPING THINGS MOVING WITH RV SLIDE OUT TIPS

Like other areas of your RV, maintenance is important to keep your slides functioning properly. There are several systems working together to help your slides operate correctly, and our expert RV slide out maintenance can help ensure everything continues to work at its best.

There are some routine steps you should take regularly to ensure your RV slide outs are working properly. This DIY RV slide out maintenance should include:

  • Inspecting the tracks when the slide out is extended.
  • Regularly inspecting your RV slide out seal when extended and retracted.
  • Listening to your RV slide out while it is opening or closing for any changes in its sounds.
  • Lubricate the RV slide out if it is making strange noises.
  • Inside the RV, inspect the area around the slide out to ensure there are no gaps when extended.
  • Ensure there is nothing to block the slide out from extending or retracting.

With regular care paid to your RV slide out, it will continue extending the interior space of your RV for many adventures to come.

WHAT IS MY RV SLIDE OUT WEIGHT LIMIT?

RV slides are designed to support the weight of the furniture and RV components included in them. If your RV slide out has a couch attached, don’t hesitate to enjoy the couch, dining area, or whatever other furniture may be part of the slide! After all, these sturdy slides are built to withstand regular use which includes the RVer taking advantage of the extended living area in their RV.

Unless your manual says otherwise, most RV and camper slide outs do not need additional support underneath them. It may look like your RV slide is floating in the air, but it is designed and housed with additional support in mind, so it is stronger than you think. Most RV slide outs have a weight capacity of anywhere from 600 to 1500 lbs, and larger RVs may have even higher weight capacities.

HOW TO REPAIR RV SLIDE OUTS

If you ever encounter any issues with your RV slide out, contact our service team at Colman’s RV  for expert RV service. We can help repair, maintain, replace, and troubleshoot any issues with your RV slide outs. (217) 793-7300

Share Button

Tips for Towing a Travel Trailer

saggy-suspension-1024x424

We will cover the basics you need to know and help you be ready for your first towing experience. It can be scary at first. But before long, you will feel comfortable and confident behind the wheel.

Hitch Your Vehicle Correctly

To drive safely, you need to be hitched safely. The basics are to make sure your hitch is on, locked in, and your cables are connected and working properly.

You also want to pay attention to the weight distribution. Looking at your tow vehicle and trailer, you want to observe a nice flat plane between the two. If there is tipping towards the hitch, or tipping away from it, they are not well balanced.

An imbalance can cause your trailer to be more vulnerable to sway, which we will talk about more in the driving section of this guide. The most accurate way to check weight distribution is to go to a truck scale and have them measure the weight on all your tires. Still, if you are parked on a flat surface, then you can generally get a good feel for it just by eyeballing it.


Check Your Visibility

Unless you have a rearview camera for your trailer, your rearview will be limited to the side mirrors on your tow vehicle. Make sure you can see the rear end of your trailer through both side mirrors.

If your visibility feels too limited, you can buy side mirror extensions meant for towing that will give you a wide-angle view as well as your normal mirror view.

Check Your Brakes and Brake Controller

Before you get out on the road, you want to make sure your brake controller is properly configured. The brake controller is what turns on the trailer brakes when you activate the tow vehicle brakes. It has a setting that controls how hard it applies the trailer brakes. To test it, get up to about 10 mph and then apply the brakes as you would for a normal stop.

You should feel like the trailer is tugging back on the vehicle just a tiny bit, especially as you come to a full stop. If you don’t feel the trailer tug, or worse, you feel it pushing you, then you need to turn the brake controller setting higher. If your stop is super jerky, then you need to turn it down.

What you are shooting for is to have the trailer braking just a tiny bit more than the tow vehicle. This keeps the trailer from pushing forward on the tow vehicle during braking, which could cause you to jackknife. It also ensures the fastest and smoothest stopping.

Know Your Height

It is crucial to know how tall your trailer is. The last thing you want to do is destroy it by trying to drive under a bridge that is too low. Find out your height, add a foot just to be sure, and avoid any passage marked with a lower clearance than that value.

Know Your Route

You don’t want to be confused over where you are going while driving a trailer. Your ability to maneuver in traffic or make course correction is considerably more limited, especially on narrow roads or in urban areas.

We highly recommend having a navigation system that includes a trailer or RV setting. This will do a few things for you. It will steer you clear of low bridges and the like. It will also keep you off of narrow one-way roads. Finally, it will let you know the proper speed for a vehicle of your type. Of course, it also helps you plot a good course to your destination.

Turning

This is easier than you might think. The trailer will naturally follow the path of your tow vehicle when moving forward. The only rule of thumb is that the longer your trailer is, the wider you want to turn. A long trailer can end up cutting a corner that was close to the vehicle. Just keep your turn as wide as the roadway reasonably permits, and you should be fine with nearly any right-angle turns. Curves and round-a-bouts are generally no sweat in a trailer. Trailers have a higher center of gravity than most vehicles. That means a turn that might be safe for a car, could tip a trailer over. Take it slow and steady and obey the recommended speed limits.
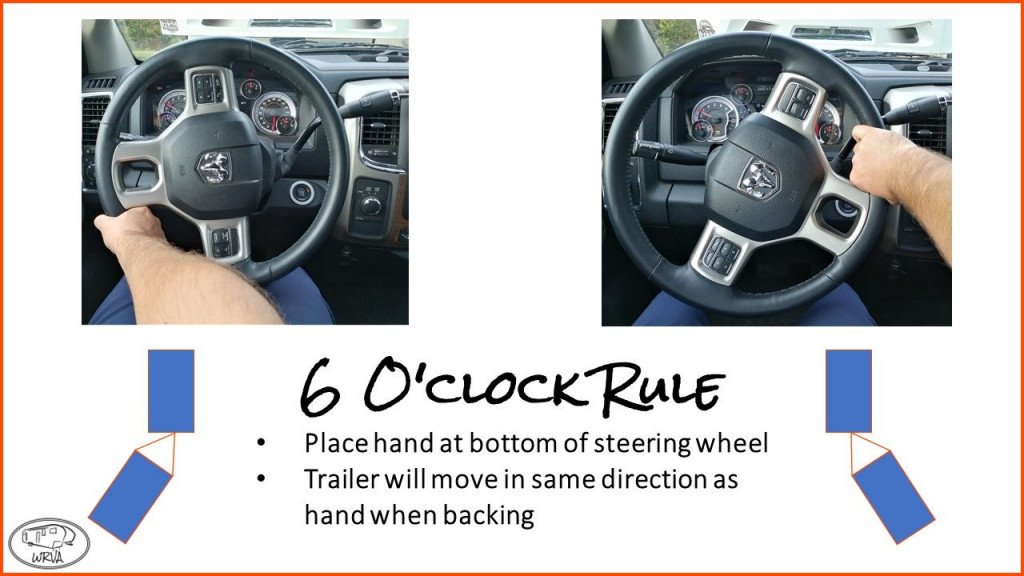
Backing Up

This is actually pretty challenging. And the bigger the trailer, the more tricky it becomes. You should practice when there is nothing to run into before you try it for real. The way a trailer backs up is not intuitive and simply takes getting used to before it feels natural. Take it slow and steady, and you should be fine. Our biggest tip for you here is to avoid situations where you need to back up under any kind of pressure. Thus, avoid doing it on the roadways, if at all possible. Stress and pressure will only make it harder and increase the chance of making a costly error.

Watch Video: https://www.youtube.com/watch?v=M3ThGeYn09w

b20c140bf4e3306f0ad2dca288eb25c8

Trailer Sway

Trailer sway is one of the special dangers of towing a travel trailer. The best thing you can do to deal with sway is to avoid it happening in the first place. Step one is to make sure you have good weight distribution on your trailer. Bad weight distribution lowers traction and amplifies the swaying. The second is not to drive in high winds. The bigger your trailer, the more sensitive it is to the wind.

Stopping Sway

The best thing to do is to use the manual trailer brake on your brake controller. This causes the trailer to engage its brakes, pulling back on the tow vehicle, forcing them into a straight line. You should practice this kind of braking in a parking lot or the like, so you can execute it calmly and know what it feels like. It can be a bit jarring if you have your brake controller such that it applies the trailer brakes a bit stronger than the tow vehicle brakes.

Share Button

First Time with an RV Checklist

Sitting behind the wheel of your new RV comes with a lot of elation and anticipation. The open road is in front of you, and with all of the national parks and wild spaces available to explore in the U.S., there is nearly endless adventure ahead.

But of course, you’ll have to make sure you are prepared before any big trip. Having the right gear ensures safety, and will save you money and time in the long run. You don’t want to have to go out hunting for niche pieces of gear or be worried about getting lost during your journey. This first-time RV checklist is for you to read and use while packing up your RV for the first time. This list isn’t exhaustive, but should provide you with the basic items, and a few extras, for your trip.

11-Tips-for-RVing-with-Kids

RV Essentials

You’ll need some essential, mechanical gear that will help you stay safe on the road. Depending on the type of RV, you may need to add a few items or ignore others on this RV-first-time checklist.

  • Drinking Hose Water
  • Sewer Kit
  • Surge Protector
  • Generator
  • Electrical Adapters
  • Water Pressure Regulator
  • Tire Pressure Gauge
  • Duct Tape
  • Flashlight
  • Emergency Road Kit
  • Extra Motor Oil and Transmission Fluid
  • Fire Extinguisher
  • Closed bag for documents like registration, insurance, reservations, etc.

camp2-1024x683

Clothing Items

You’ll know which clothing items are best for you, but when on the road, it’s best to keep it simple and not overpack.  We’ve put together a list of clothing items that work well in the RV as well as on adventures like hiking or backpacking. Make sure to choose clothing items that are comfortable, made of high quality materials to keep you warm or cool, and are suitable for both adventure and relaxation.

  • Sun protective hat
  • Rain Gear
  • Shoes: Chacos or Tevas, hiking boots, running shoes, etc.
  • Bathing suit
  • Down Jacket
  • Socks
  • Underwear
  • Short and long sleeve shirts
  • Base layers (if backpacking)

dd4ed6ebe74d5eb59b9559bf5a0f62f5

Bedroom Items

These bedroom items will be obvious to bring along, but it’s easy to get wrapped up in all the things you’ll need to fill your RV. These are some must-haves for your bedroom that you wont want to forget.

  • Bed and sheets
  • Clothes hangers
  • Sewing kit
  • Towels
  • Blankets
  • Pillows
  • Storage Organizer

Monica-Bennett-Well-Equipped-RV-1-of-14

Kitchen & Cooking Supplies

You’ll probably be spending a lot of time in the kitchen between hiking, biking or even surfing. Cooking is a great way to bring the people in your RV together. You’ll want to make sure you have the right supplies to cook and bake the things you love.

  • Cutting Board
  • Utensils and Cutting Knives
  • Dish Soap
  • Cooler
  • Matches or a lighter
  • Skillets
  • Dish Towels
  • Garbage Bags
  • Paper Towels
  • Can Opener
  • Camping griddle
  • Pot Holders
  • Napkins
  • Reusable storage bags
  • Tupperware
  • Sponge and other cleaning utensils
  • Disinfecting wipes

Happy Camping 🙂

Share Button

Forest River RV Roadside Assistance

Does Forest River RV offer a Roadside Assistance Program?


RV-Roadside-Assistance-1080


Forest River RV brands come with one year of Roadside Assistance included for the first year on most new motorized and towable Forest River RVs*. This service provides you with 24/7 coverage for the following services:

  • Towing
  • Jump Starts
  • Tire Assistance
  • Delivery of Fuel and Emergency Fluids
  • Locksmith/Lockout Service
  • Winch Out
  • Technical Support
  • RV Mobile Mechanic

If you purchased your vehicle prior to 1/1/2019, please call the following number for emergency roadside assistance: 877-801-0333

If you purchased your vehicle on or after 1/1/2019, please call the following number for emergency roadside assistance: 866-209-2895

Share Button

Protect Your RV with NanoCure

NanoCure-Logo-Color-1

Protect your home away from home, from life’s surprises on the road

Utilizing superior formulations, our NanoCure with Nanoxide provides recreational vehicles a protective barrier for all interior and exterior surfaces. Even the most common roadway incidents can cause lifelong damage to an RV. Our RV protection coverage is tailored to the needs of the recreational vehicle owner, covering components such as vinyl awnings and end caps.

Life on the road can take a toll on your RV’s appearance

NanoCure Protective Coatings cover just about any surface an RV has, but the depth of protection our innovative coatings provide is anything but surface level. Applied by certified technicians, NanoCure® protectants will keep one of your largest investments looking brand new, no matter how many trips you and your family take.

rvsales

Cutting Edge Technology For the Win

Having your vehicle protected by nanotechnology-powered NanoCure Protective Coatings will result in a greatly reduced amount of time spent maintaining your vehicle’s appearance. Our  protectants helps make your vehicle safer, also, thanks to reduced glare and improved windshield visibility. More than topical retail waxes and water-based protectants, NanoCure with Nanoxide becomes one with both glass surfaces and a vehicle’s painted metal panels to ensure the greatest, strongest protection. Come see us today and have your RV protected!

Call us to learn more 217-793-7300

Share Button

Fall Camping Tips

How to stay warm and dry while camping in cold weather

fall-camping-tips

Layer up on clothing for fall camping

And, layer down. The unpredictability of fall weather means packing heavier clothing, as well as lighter clothing. Be prepared to dress for comfort rather than for style while camping in cold weather.

Let’s briefly go through the various recommended layers starting with the base layer, which is an article of clothing, such as a thin long sleeve, that is in direct contact with your skin. Make sure it’s snug and allows for easy movement.

Then, your mid layer insulation, such as a sweater, keeps your body heat in. Lastly, your outer lawyer protects you from the elements in cold weather and can include a windbreaker jacket.

Pack the right supplies to stay dry  

Other than the fluctuation in temperatures, fall is the start of rain season in some parts of Canada, so pack your dry gear, too. Rainproof pants, rainproof jacket, proper headwear, and waterproof boots are a great start to enjoying a fall camping trip. Extra pairs of warm socks, and back-up shoes or boots are perfect for ensuring you are prepared for anything.

Other than clothing, you’ll want enough firewood and tarps to keep you warm and dry. Tarps are key to keeping your campsite dry, so find a campsite within trees where you can easily hang several tarps to cover your tenting and eating areas. Staying dry means staying warm in cold weather.

Stay warm in your tent while fall camping

Within your tent, carpets and rugs not only give a cozy feeling, but they also provide that extra insulation from cold weather. And, once you are tucked in for the night, a mummy sleeping bag is ideal as it comes with a hood to cover your head and keep your body heat within. A sleeping bag may not be as effective unless you have a sleeping pad underneath, so make sure you pack a sleeping pad to keep your body one step away from the cold of the earth.

Some extra warmth can come from a hot water bottle, so pack one of those to snuggle with, along with something to heat your water. Including heat  packs on your packing list will give you opportunities to throw them in your sleeping bag or under clothing for extra warm comfort in cold weather.

Eat foods that are best for cold days

It may seem obvious that packing warm meals are best for cold weather, but what is an easy-to-pack warm meal to eat while fall camping? Hot chocolate is a given as a drink, and also recommended is a Campertunity favourite: shish kababs. With an easy to make recipe, just add pieces of beef and / or vegetables to a skewer and let it cook.

Other easy, warm meals include baked brown beans served in hot dog buns, campfire pizza, and hearty stews and chilis. For stew ingredients, we recommend fresh local vegetables for an added healthy touch. Keeping your food recipes simple is the best plan, considering you’ll be packing more gear for fall camping weather.
Getting outdoors in any season is possible, especially when following the various tips for camping in cold weather. Packing the right gear, eating the right foods, and enjoying the beauty of nature will make anyone fall in love with fall camping.

Share Button